Tuesday, April 30, 2024

Stampin’ Fancy Friday - Technique Focus Challenge


I am a bit behind this week … and it’s only Tuesday! It was my turn to post for this month’s Stampin’ Fancy Challenge - last FRIDAY!! And I totally SPACED it! So, here I am trying to play catch up! This challenge was so fun! We were all tasked with picking ANY technique and sharing how to do it … so here I am with the whitewash technique with a twist. I did it on BLACK paper (instead of how it is traditionally done on Crumb Cake).


This technique is really quite simple. I stamped my focal image using Versamark  and the new Citrus Blooms Bundle (which YOU can order starting TOMORROW!). I sprinkled it with some White Embossing Powder and then heat set it. Next, I pulled out my Watercolor Pencils and got to work. First, fill your image with your white watercolor pencil. Next, pick the colors of your choice to color the images AGAIN to make them pop right off the Basic Black cardstock!


Isn’t it purdy?? It really packs a punch and is so much fun (it makes me feel like a little kid again coloring in my coloring books!).

Stamps: Citrus Blooms
Paper: Basic White, Basic Black, Old Olive
Ink: Versamark, Black Memento, Watercolor Pencils
Accessories: Citrus Blooms Dies, Double Oval Punch, White Embossing Powder, Basic Gray/Smoky Slate Pearls, 1/4” Black & White Gingham Ribbon, Petal Pink/White 1/4” Diagonal Ribbon Combo Pack

Check out all the fun things created by the Stampin' Fancy Friday Team on Instagram at https://www.instagram.com/stampinfancyfriday/!!

photo blogsignature2018_zpsxetiovv3.png

Sunday, April 21, 2024

Monday Montage #259


Welcome back for another round of fabulous and fun creations from the Monday Montage Crew! I was out of town last week and ran a 10K on Saturday, so I was grateful I made this card when I did my last project for Monday Montage! That hasn't happened in a looooong time!


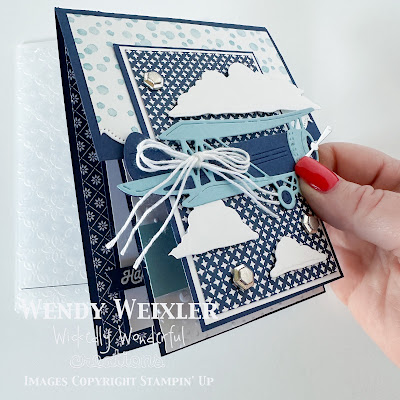
Once again I am using a "fun fold" I saw on YouTube by Lisa Curcio. I don't doubt that this will NOT be the last time I use this particular layout ... I'm kind of obsessed with it!

And EEEEEEP! How ADORABLE is this little biplane in the clouds??? Adventurous was at the TOP of my list as soon as I saw it on the preorder for the 2024-2025 Annual Catalog!


This is the second layer. By lifting the top flap this "card inside the card" becomes exposed. 

More airplanes! I sponged the edge of the little cloud with Balmy Blue ink. I used the Dotted Circles Embossing Folder for the background. Isn't it fun??


Opening the card once more reveals the "final" inside, where I stamped a sentiment on the little airplane banner die ... and, of course, there are more clouds!


Here's a view from side so you can see all the pretty layers.  The measurements you will need are as follows:

BASE:
- Night of Navy: 4 1/4" x 11", score at 5 1/2"
- Cut off 2 3/4" on one end for TOP
- Designer Series Paper (top): 2 1/2" x 4 1/8”
- Designer Series Paper (inside): 4” x 5 1/4"
TOP:
- Night of Navyt: 2 3/4" x 4 1/4"
- Basic White: 2 5/8” x 4 1/8”
- Designer Series Paper: 2 1/2" x 4”
INSIDE CARD:
- Night of Navy: 3 1/4" x 10”, score at 5”
- Balmy Blue: 3 1/8" x 1.5"
- Basic White 3 1/8” x 4 7/8”, cut 2

I am going to enjoy coming up with more ideas for this fold ... it's so much fun!

Stamps: Adventurous Sky, Drizzling Droplets
Paper:  Basic White, Night of Navy, Balmy Blue, Silver Foil, Mediterranean Blooms DSP
Ink: Versamark, Night of Navy, Balmy Blue
Accessories:  Adventurous Sky Dies, Scalloped Contours, Dies, Industrial Trinkets, Dotted Circles 3D Embossing Folder, White Baker's Twine, White Embossing Powder

Here's a blog roll just in case you get "stuck" trying to hop around ...


Click "Next" to see Bree Renwick ... GREAT cards for graduation season!


photo blogsignature2018_zpsxetiovv3.png


Friday, April 12, 2024

TGIF #468 - Sketch Challenge


So happy it's time again for the TGIF Challenge!! I have really enjoyed doing some sketch challenges recently and this one is no exception. I had to think long and hard about which stamp set/dies I wanted to use on this one ...


Since all challenges are for inspiration, I kinda bent this sketch a little out of whack. I really wanted to use the cute little boots from Garden Meadows on this ever-adorable Glorious Gingham DSP.  I used my Simply Scored board too created the little ruffled piece of Berry Burst cardstock. I scored a 1/2" strip of cardstock at scored it every half inch. Then, I just accordion folded the strip and taped it down.

The window die from the Garden Meadows Dies is so fun! I used my Stampin' Write Markers and splattered the little frame with them (Blueberry Bushel and Berry Burst). 

Stamps: Garden Meadow, Leaf Collection
Paper: Whisper White, Blueberry Bushel, Berry Bushel, Lemon Lime Twist, Glorious Gingham DSP
Ink: Black Memento, Lemon Lime Twist, Blueberry Burst; Stampin’ Write Markers - Blueberry Bushel, Berry Burst
Accessories: Garden Meadows Dies, Happy Thoughts Dies, Ribbon Duo Combo Pack, 2024-2026 In Color Shimmer Gems

Coincidentally enough, the colors I chose for this week's TGIF Challenge are the exact colors for last week's TGIF Challenge (I didn't have a chance to play last week, and these colors were randomly the ones that were used!)! Soooo crazy how that happened because I wasn't even trying!

photo blogsignature2018_zpsxetiovv3.png


Monday, April 8, 2024

Monday Montage #258


Well, well, well ... I crafted this past weekend and it was GREAT!! I FiNALLY cleaned my craft room (which hasn't been done since before I made my Christmas cards!)! I really need to stay on top of it FOR REAL this time ... it's much more fun to create when you can actually find your stuff!! This week the Monday Montage girls have once again hit it out of the park!


I used a fun layout I saw on YouTube by Lisa Curcio.  It was so much fun and I really enjoyed creating it (so much so that I made two different ones ... I'll share the other one with you later this week)! It's kind of a card within a card within a card. Here's the card all closed up. I used images from Country Flowers which I colored with my Stampin' Blends. Note:  The deeper-colored yellow flowers were created by first coloring them Bubble Bath, but I decided I didn't love that; so I colored with Daffodil Delight on top of that which gave me a deeper orange-y yellow color which I really quite like!


This is the second layer. By lifting the top flap this "card inside the card" becomes exposed. I used one of the Brilliant Backgrounds Dies to give the Garden Green strip some texture. The Basic White Background was brought to life using the 3D Eyelet Embossing Folder (which I preordered from the new and upcoming catalog!). 


Opening the card once more reveals the "final" inside, where I stamped a sentiment on one of the shapes from the Stylish Shapes Dies. I added a few of the flower dies for accent. I left enough empty space so that I can write a little note when I sent this cutie out.


Here's a view from side so you can see all the pretty layers.  The measurements you will need are as follows:

BASE:
- Daffodil Delight: 4 1/4" x 11", score at 5 1/2"
- Cut off 2 3/4" on one end for TOP
- Designer Series Paper (top): 2 1/2" x 4 1/8”
- Designer Series Paper (inside): 4” x 5 1/4"
TOP:
- Daffodil Delight: 2 3/4" x 4 1/4"
- Basic White: 2 5/8” x 4 1/8”
- Designer Series Paper: 2 1/2" x 4”
INSIDE CARD:
- Daffodil Delight: 3 1/4" x 10”, score at 5”
- Garden Green: 3 1/8" x 2"
- Basic White 3 1/8” x 4 7/8”, cut 2

Isn't this the FUNNEST???? I haven't done a good "funky fold" card in quite some time! This one was very satisfying!

Stamps: Country Flowers
Paper:  Basic White, Daffodil Deliight, Lemon Lolly, Garden Green, Citrus Blooms DSP, Regals DSP
Ink: Versamark, Black Memento, Garden Green; Stampin' Blends - Dark & Light Smoky Slate, Dark & Light Daffodil Delight, Dark & Light Lemon Lolly, Dark & Light Granny Apple Green, Dark & Light Crumb Cake, Dark & Light Bubble Bath
Accessories: Country Flowers Dies, Stylish Shapes Dies, Brilliant Backgrounds Dies, Double Oval  Punch, Scalloped Contours Dies, Eyelet 3D Embossing Folder, Basic Gray/Smoky Slate Pearls, White Baker's Twine, White Embossing Powder

Here's a blog roll just in case you get "stuck" trying to hop around ...


Click "Next" to see Bree Renwick ... she is Just Kiddin' Around and her cards are ADORBS!


photo blogsignature2018_zpsxetiovv3.png