Showing posts with label 3D Projects. Show all posts

Tuesday, June 25, 2019

Because I Knew You ...

Sigh ... my heart is heavy. My dear, sweet, kind, amazing, funny, generous and all-around amazing friend and next-door neighbor died last Wednesday. I have known Bert and his wonderful family for close to 35 years. My husband has enjoyed him as a next-door neighbor for his entire life (as we purchased his childhood home from his parents in 1990). Where do I begin??? Anything I tried to say or write here would not be even close enough to an adequate tribute to a man who has been more than just our neighbor. He has been a second dad to both of us. He has been the fun granddad to our kids. He has been an example of what it means to be Christlike. He was lighthearted, happy ... and FUNNY!! He knew more bad dad jokes than any other human being I have ever met!!! He was the king of water fights ... I can't even begin to say how much I ALREADY miss him shouting over the backyard fence at me ... "Yo, Wendy! This is your neighbor, Bert!" He was truly one of the best people I have ever known. He taught me through example, quiet wisdom and unconditional love. The hole in my heart is SO huge. I am by far not the only one who feels this at his passing. His incredible family are just about as close as a family can be ... and they feel his absence with immeasurable weight. The neighborhood, our church congregation, our community ... none of us will be the same without him ... but we are all better people for having known him.

I spent most of the day last Thursday making this floral wreath as a tribute to our Bert. It hardly seems enough, but I wanted to give his beautiful wife, Violet, some flowers that would last more than a week ... and that would convert some of the love I have in my heart for their entire family. I used some new things and some old things to put this together, and it still doesn't seem enough.

Stamps: None
Paper: Mint Macaron, Soft Sea Foam, Pear Pizzazz, Rich Razzleberry, Smoky Slate, Mango Melody, Daffodil Delight, Mossy Meadow, Pool Party, Highland Heather, Purple Posy, Whisper White, Festive Farmhouse DSP (retired)
Ink: Rich Razzleberry, Flirty Flamingo, Pear Pizzazz, Highland Heather
Accessories: Magnolia Memories Dies, Succulent Dies (retired), Halloween Night Enamel Dots (retired) Leaf Punch, Sprig Punch, Pearl Accents, Linen Thread, 12"x12" shadow box, Cricut and vinyl (for sentiment)

'Til we meet again, my dear friend and Disney buddy, Bert. We all felt so much love and kindness from you. And because I knew you, I have been changed for good.

 photo blogsignature2018_zpsxetiovv3.png

Saturday, August 18, 2018

Crisp, Clean Air!

Strange things are afoot at the Circle K!!! (For those of you who "get" this ... you are my tribe! For those of you who DON'T ... you should Google it ... and then make sure you see the movie I am referencing!)!! I just gave my blog a VERY badly-needed facelift (It's been WAAAYYYY too long!) ... and I made something with the LUSCIOUS new Nature's Poem DSP!!! Oh how I LOVE fall ... and ALL the colors!!

With all of the CRAZY out-of-control fires in the Western US (especially poor California!), the air quality in Salt Lake City has been absolutely RETCHED for the past three weeks. I'm talking about air you can CHEW, guys! It's been soooo hot ... and with the air being so thick it kills your lungs and your eyes!! On Friday morning I saw the first glimpse of blue sky I had seen in FOREVER ... and I went outside for an early-morning run ... it was AMAZING! So, between being able to run AND being able to craft something for fun within the same 24 hours, I am pretty stoked!!

This ornament ... how stinkin' caYOOT, right??? I should have taken pictures as I was making it to show you "how to" at every stage. However, I never expected it to turn out so fun, so I was NOT preparing ahead of time! I will do my very best to try and describe what I did.

I ended up cutting out eleven 2-1/2" circles and eleven 2" circles (you can use either your circle punches or the Layering Circles Framelits to accomplish this). I also cut out an extra 2-1/2" circle from the same DSP, and an extra 2" circle from one of those cardboard inserts that come in your new packages of DSP ... you now which one I mean, right??? The cardboard circle serves as a base for the ornament, and the extra 2-1/2" circle will cover the cardboard on the back of the ornament when you are all done. Ya with me so far??? GOOD!!


Take the 22 circles you have punched and make them into little "ice cream cone" shapes. Wrap them so that each one makes a little point at the bottom ... I used a glue dot to secure them together (placement shown by arrow in picture). When you are all done making the little cones, you are going to make two miniature "wreaths" ... one with the "big circle" cones and one with the "little circle" cones. (I reversed the paper on the small cones to the other side that I exposed on the large cones ... adds depth and dimension!! You could also wrap them all the same way for more uniformity!)


If you start with the large circle cones, take two of them and lay them next to one another so that they are touching from the pointy tip to the part of the cone that opens up ... I used a glue dot (or two!) to stick them together (again, use picture to reference for glue/glue dot placement). Keep putting them together in this fashion until you have made a "wreath" with the large cones and then repeat with the small cones. I HOPE this makes sense!!! Once you have both wreaths completed, you are ready to assemble!

Place the larger of the two wreaths onto the cardboard circle you punched earlier ... you can either use glue dots or some Multipurpose Liquid Glue to adhere it. Next place small dots of glue (or the glue dots) to position the smaller wreath directly on top of the larger wreath ... now you will have a double-decker wreath and will just need to add a "hanger" and the center of your newly-formed "flower" ornament.

I used some Crumb Cake Bakers Twine to make the hanger for my ornament. I single crochet a long strand of it until I got it to the desired length (I didn't even use a crochet hook ... just did it with my fingers!). I then attached the ends of the "hanger" to the cardboard disk on the back of the ornament and then proceeded to cover the back, to hide the cardboard circle, with the extra 2-1/2" piece of DSP I punched earlier.

For the center, I used the very smallest scalloped circle from the Layering Circles Framelits. I rubbed some glue onto the top of the circle, then proceeded to spiral a piece of bakers twine to make the center ... I did a smaller layer on top of that one with an additional piece of bakers.

If you have any questions so that I can clarify this, just shoot me an email (my email link is in the sidebar). Overall, this is SUPER easy to make and didn't take much time! I want to make a BUNCH more to hang from my fireplace mantle as soon as the weather cools off a bit! (And wouldn't these be SO PRETTY with some of the new CHRISTMAS DSP???)

Stamps: NONE
Paper: Nature's Poem DSP
Ink:  NONE
Accessories: Nature's Twine, Layering Circles Framelits Dies (or circle punches ... 2-1/2" and 2"),

The next couple of weeks are going to be a whirlwind ... one road trip and one day-trip to Disneyland will be happening!!! Happy Birthday to ME!!!

 photo blogsignature2018_zpsxetiovv3.png

Wednesday, August 15, 2018

Sweet Treats!

A day OFF!! A DAY OFF!!! I can't remember the last time I had an ENTIRE day where I did NOT have to leave the house! I could just STAY HOME!!! Which I did ... and it was GLORIOUS!!

As I was putting some things away in my crafty cupboard (ok ... yeah, I have TWO of them!) ... so as I was putting some things away in ONE of my crafty cupboards I came across my little Gift Bag Punch Board. And I just stared at it ... "How long have I had this???" "Why haven't I ever actually USED this????" Well DANG!!! So last night I looked up a "how-to" video on youtube to make sure I could figure out what I was doing ... and I made this fun little bag!!! How stinkin' caYOOT is THIS??? It was easy to make ... and I'm pretty sure after making a couple of them you could put yourself in mass-production mode for those Christmas neighbor treats you're gonna make this year, right??? I used the SUPER adorable "Festive Farmhouse" stamp set for the sentiment (and the framelits, too!)! This is going to be a GREAT holiday season ... I can already tell!! But it's STILL nearly 100 degrees outside ... and August ... so I'm not quite ready to dive in YET!

Stamps: Festive Farmhouse
Paper: Whisper White, Night of Navy, Red Glimmer, Under the Mistletoe DSP
Ink:  Night of Navy, Old Olive
Accessories: Stitched Shapes Framelits, Farmhouse Framelits, Sprig Punch, Night of Navy Baker's Twine, Striped Burlap Ribbon, Gift Bag Punch Board

Back to work today ... sigh ... at least my craft room is STILL CLEAN ... and awaiting my next visit!!

 photo blogsignature_zpsakee3ogk.png

Monday, March 19, 2018

Monday Montage #112


Rain, snow, sunshine, snow again ... spring is really working on getting here!! And so are the Monday Montage girls! I'm excited!!!


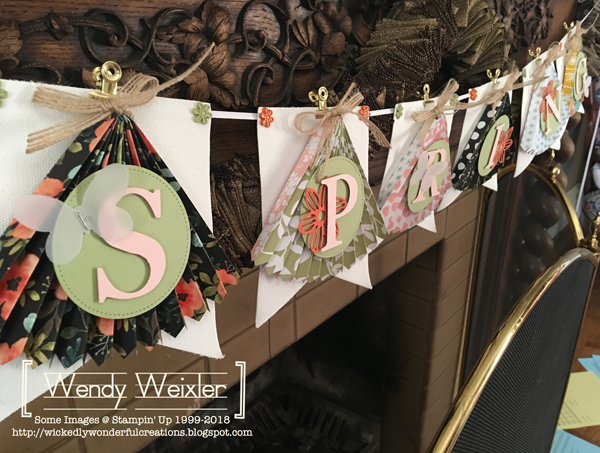
As the seasons are TRYING to change, I am TRYING to help them along!! I love making banners ... and I haven't had a "spring" one to hang up before! I figured now was the PERFECT time to take care of that.

Stamps: NONE
Paper: Pear Pizzazz, Powder Pink, Tangerine Tango, Vellum, Whole Lot of Lovely Designer Series Paper
Ink: NONE
Accessories: Whisper White Grosgrain Ribbon (retired), 3/8" Burlap Ribbon, Gold Library Clips, Butterflies Thinlits, Mini Stapler (retired), Stitched Shapes Thinlits, May Flowers Framelits, Flower Brads (retired), Alphabet Essentials Bigz Dies (retired), Linen Banners (from Michaels!)

Here's a more close-up view ... colors, butterflies, flowers! I even dipped into some of my "vintage" (aka "retired") goodies to complete the look. I have always loved the Bigz Rosette Die (NEVER going to get rid of that one!)! The Essentials Alphabet Dies are also always going to remain in my cupboard ... of COURSE I bought them RIGHT before I found out they were going to retire! And the little flower brads??? I NEARLY "donated" those to the local elementary school a while back ... but I'm kind of glad I didn't, as they made the PERFECT accent!!

We have had THREE snowstorms since last Thursday ... which we have REALLY needed! It's all melted already, but I wouldn't be surprised if we ended up with more before the week is through!

Click "Back" for Kaitlyn Zumbach and "Next" for Amy O'Neill ... beautiful, beautiful, BEAUTIFUL!


 photo blogsignature_zpsakee3ogk.png

Sunday, December 17, 2017

Monday Montage #106

Deck the halls and all that jazz!!! Can you believe we are only a WEEK away from CHRISTMAS???? WOWZA!!! Seriously not sure HOW that happened already!!! And at this point I figure I am as close to ready as I'm gonna get (except for wrapping ... and stocking stuffers!)! Lucky for me I am just finishing up with my neighbor gifts ... just in time to share them with y'all and my Monday Montage friends!!

The "cheat" about this is that it was created with my Cricut. In my favor, all the ribbon and the paper is Stampin' Up, so I guess I can claim that I am still using Stampin' Up goodies to make my neighbor goodies, right??? When you have a family tradition known as "Keebler Elf Sunday" (even though we made all the cookies on SATURDAY this year), you gotta just squeeze in the projects you can when you can!! And we honest bake about 1,000 cookies ... NOT kidding. But they are delicious, and it goes pretty quickly, so at least that part is happy!

Supplies: Circut "Very Merry Tags"
Paper: Basic Black, Very Vanilla
Accessories: Retired Real Red Ribbon, Rhinestone Basics Jewels


Each of these little bags contains 15 "lucky pennies". They stay soft FOREVER!!! And they are a TOTAL favorite of my family (and also of many of my friends at this point!)! Sweet side note ... I didn't even know that these were my dad's most FAVORITE cookies EVER until about two Christmases before he passed. He used to steal some of the ones that I had set aside for some friends that HE was supposed to deliver to!! I never knew that until he told me! So I made sure he had his very own batch after that!! So these cookies remind me of him and make me smile!


And before y'all ask ... here's my recipe!!! This has become an annual tradition here on my blog ... to share this recipe. The only "hint" I can give you is that you should NOT "double" this recipe ... each batch has to be it's own thing, or they won't turn out as well. Believe me, I've tried!!! And considering we have probably made about 10,000 of these cookies, I feel somewhat of an expert on the subject!

Lucky Pennies

2 1/4 C. all-purpose flour
2 t. baking soda
1 t. ground cinnamon
1 t. ground ginger
1/4 t. ground nutmeg
1/4 t. ground cloves
1/4 t. salt
3/4 C. (1½ sticks unsalted butter, softened)
1 C. firmly packed brown sugar
1/4 C. molasses
1 large egg
granulated sugar (for coating cookies)

In a large mixing bowl, stir together the flour, baking soda, cinnamon, ginger, nutmeg, cloves and salt. In a separate large bowl, use a wooden spoon to cream the butter and brown sugar until smooth. Stir in the molasses and egg and mix until well blended. Gradually stir in the flour mixture until combined. Cover the dough and refrigerate it for at least 1 to 2 hours or until firm enough to roll into balls.

Heat the oven to 375 degrees. Use a teaspoon to scoop the dough from the bowl and roll the cookies into about 1"-in-diameter balls. Roll the balls in a shallow bowl of granulated sugar. Place the balls on an ungreased baking sheet, leaving 2 inches between the cookies. Bake for 6 to 9 minutes or until the cookies are crinkled and set.

Cool the cookies on the baking sheets for about 5 minutes. Using a metal spatula, transfer them to a wire rack to cool completely. Repeat until all the dough is used. The cookies can be stored in an airtight container in the freezer for up to 1 month and at room temperature for up to 1 week.

Makes about 8 dozen cookies.

Click "Back" for Melissa Stout and "Next" for Amy O'Neill ... their projects are joyful AND triumphant!!


 photo blogsignature_zpsakee3ogk.png

Friday, August 19, 2016

Control Feak Peekin' for the Holidays!

It's time for the Control Freaks Holiday Catalog Sneak Peek Preview Blog Tour!! After a fun couple of days with my dear friend up in Park City (which included an EXTREME tubing slide aka The Nordic Skip Jump!) ... I am back home and ready to share! (and it was AWESOME, by the way!!!

Did you see LeeAnn Greff's GORGEOUS and FUN creations??? If you are following our hop around, she was right before me!!! AMAZING!!


Halloween is my most-most-most favorite holiday EVUH!!! So I was happy to have a reason to make some Halloween goodies to share (even though it IS only August!) LOVE the creepy, staring EYEBALLS!!

Stamps: Jar of Haunts
Paper: Whisper White, Basic Black, Perfect Plum, Halloween Night Specialty DSP
Ink: Basic Gray, Pink Pirouette, Melon Mambo, Pear Pizzazz
Accessories: Halloween Night Designer Washi Tape, Labels & Tags Framelits, Halloween Night Baker's Twine, Silver Sequins

Made this bottle topper tag from the new Cheerful Tags framelits dies ... don't you LOVE the swirly background behind the greeting at the top??? That's made with one of the dies AND the new Pumpkin Pie Glimmer DSP. What's NOT to love????

Stamps: Jar of Haunts
Paper: Basic Black, Whisper White, Halloween Nights Specialty DSP, Pumpkin Pie Glimmer DSP
Ink: Perfect Plum, Basic Black Wink of Stella
Accessories: 1" Circle Punch, 1 1/4" Circle Punch, Cheerful Tags Framelits Dies, Halloween Nights Baker's Twine, Halloween Nights Washi Tape, Cascade Ice Sparkling Water

Park City was AWESOME!!! It was fun to have a couple of days OFF. The weather was beautiful, the company was great and the relaxation was just what I needed!!

Next up??? The very clever Kelly Acheson!!! She's as nice as she is talented ... so happy to call her my friend!


 photo blogsignature_zpsakee3ogk.png

Sunday, July 24, 2016

Monday Montage #74


It's Monday Montage time again!!! And I have spent the WHOLE day with a GNARLY headache!!! Thank HEAVEN for this project that I had never posted from my OnStage display projects (and yeah ... you can TELL that's it's a little behind since we are currently in the middle of a SCORCHING summer!)!

See what I mean??? But this DID hang on my door until the Fourth of July, so I actually DID use it and LIKE it!! Sadly, the "Little Letters" Thinlits have retired since I made this ... BOOHOO!!

Stamps: NONE!
Paper: Flirty Flamingo, Blushing Bride, Emerald Envy, Whisper White, 2016-2018 InColor DSP Stack
Ink: NONE
Accessories: Bontanical Builder Thinlits Dies, Blushing Bride Sequin Trim, Hello You Thinlits, Little Letters Thinlits (retired), Circle Framelits, Flirty Flamingo Ruched Ribbon, Simply Scored

Took a VERY long nap today ... and had one of those "can't-escape-EVERYthing-bad-and-stressful" dreams ... woke up with an even BIGGER headache!!! I'm going to bed VERY early because I have a 1/2 Marathon to run in the morning and have to be at the pickup point by 4:00 AM!!!! UGH!!!

Click "Back" for Melissa Stout and "Next" for Amy O'Neill ... GREAT way to spend Monday Montage AND Pioneer Day here in Utah!!!


 photo blogsignature_zpsakee3ogk.png

Thursday, October 1, 2015

Spookin' the Halls ...


Was home from work a couple of days ago and had a VERY long list of "to-do's" I had hoped to accomplish. But then, alas, I got sucked in to the BLACK HOLE (aka Pinterest)! So very MUCH fall/Halloween cuteness and creativity I thought I would weep ... but instead I got crafty!! And it was FUN!!

True confession ... my fireplace is one of my favorite things in my whole house. It's GORGEOUS!! And it looks AWESOME decorated for the holidays ... I mean, really??? How could it NOT??? Initially, I had the idea I was going to create just a burlap garland ... and perhaps "sprinkle" it with a few fall-colored leaves (happy for me I had some "leftovers" from my Spooky Witch Halloween Hat class!).  But, as you can see, I did a bit more than that!  I strung the leaves (which can be easily cut out using the Leaflets Framelits Dies and then embossed with the Woodgrain Textured Impressions Embossing folder) on some Linen Thread ... and used some wooden beads I had bought a couple years back to make a fall garland that NEVER HAPPENED!! GO ME!!

First, I made this burlap garland (thanks to my friend Ali who happened to have a HUGE spool (we're talkin' Costco-sized here, people!) of burlap ribbon left over from things she had bought to decorate for her daughter's wedding reception last June.  FIFTY WHOLE YARDS of it!!! And I used every last INCH!!  This was SO easy!!  I used some twine and an upholstery needle ... ran the twine right down the middle of the ribbon in a long running stitch and then just pulled the ribbon up tight!!! It just gathered beautifully!!!  Nice part is that I will be able to use this for MANY different holidays!!

I found this cute little chalkboard disc "garland" at one of my favorite fun places to shop ("All That Stuff in the Barn" in Midway, Utah). A couple of weekends ago I had a "sleepover" with some of my girlfriend's up above Heber in the beautiful hills! GREAT time! GREAT food! GREAT shopping! LOTS of laughing ... I cut some rather large letters out with my Silhouette, then I laid the negative cut of the letters down on the chalkboard disks and just filled them in with chalk!!! (Not gonna lie, took me a while to come up with a 7-letter word that was appropriate for Halloween!)! Bonus???? When we switch to November, I can just erase the letters and do something little more "Thanksgiving" appropriate ... 7 letters ... I need to start thinking about THAT one NOW!

I pulled out an "oldie but a goodie" for this little banner (translate ... it is RETIRED!). I also pulled out anything from my patterned paper stash that looked like "fall" to me ... I also used some FABULOUS Early Espresso Quilted Satin Ribbon from a few years back (this project REALLY helped me use up some of my hoarded stash!)! I sewed the ribbon to the banner pieces I had cut out to make the garland ... SUPER easy!

Paper:Delightful Dijon, Cajun Craze, Tangelo Twist, Crumb Cake, Rich Razzleberry, Blackberry Bliss, Cherry Cobbler, Happy Haunting DSP, Color Me Autumn DSP (retired), Motley Monsters DSP (retired)
Accessories:Perfect Pennants Bigz Die (retired), Early Espresso Quilted Satin Ribbon (retired), Leaflets Framelits Dies, Woodgrain Textured Impressions Embossing Folder, Linen Thread, Wood Beads, Chalk and Chalkboard Garland, Burlap Ribbon, Sewing Machine

I went to ComicCon with my daughter and her friend last week ... SERIOUSLY???? Oh.My.WORD!!! We had SO MUCH FUN!!! I love to dress up anyway, so this gave me an excuse (don't judge). Han Solo in carbonite? Yeah ... HAD to have our picture taken with THAT!!! I was proud of the fact that I made all THREE of the costumes we are wearing (for those who are out of the loop, I am "Sally" from "The Nightmare Before Christmas" ... my daughter is "Little Sister" from a video game called "BioShock" ... and her friend, Quinn, is Mal Reynolds from Firefly (to be totally fair, I only made his coat ... and I got the suede for $1.99/yd which makes this even MORE cool!!)!


And ... well ... Iron Man ... and War Machine ... and me in a Captain America shirt ... can't think of how it gets much better than THIS?? GOOD TIMES!

 photo blogsignature_zps8e79d50b.png

Sunday, July 26, 2015

Monday Montage #48

REALITY CHECK!!! Holy saMOKES!!!! The last two weeks have been positively INSANE in my universe!!! I think this is one of the LONGEST dry spells I have had in posting to my blog in the entire 8+ years I have been blogging ... sigh ... life has been on the fast track for SURE!! The last time I posted it was for Monday Montage ... two whole weeks ago!!! My life lately = Wild Roller Coaster!


See what I'm talking about???? THIS is only a teeny-tiny portion of what my craft room looks like RIGHT NOW ... between making 72 little "secret sister" gifts for our church girls camp (which was July 13-15) ... and THEN trying to get myself set up for all the fun things I was going to share with friends at Convention (which, on a lot of levels, turned into an EPIC fail!!)!!! Sigh ... I need a VACATION!!

So, this week for Monday Montage I am sharing the things that I made for the girls at camp. I have been kind of "in charge" of getting things rolling with this particular event at girls camp for the last umpty-zillion years (by choice, mostly!). The premise behind this is that we give each of the girls at camp the name of one of the OTHER girls at camp ... and every day during the time we are there they are to give a little "something" to their secret sister ... a thought, a treat, something they have made. We don't make a big deal out of it (we give them a $5 spending limit). It's so fun seeing what they do for each other. As part of this, I make a little "gifty" for each girl for each day we are at camp. It's a LOT of work ... but I have to admit I LOVE it!!

I got the idea for this cute little lip balm flower from the ever-talented Kay Kaltoff. I totally GEEKED out when I saw a link for these on Pinterest. How freakin' ADORABLE are THESE??? (and what a GREAT way for me to use up a bunch of my retired DSP!)

Stamps:  NONE
Paper: Subtles and Brights Pattern DSP (retired), Daffodil Delight, Marina Mist
Ink:  NONE
Accessories:  Floral Frames Framelits, EOS Lip Balm

This is another little project I "stole" from someone else ... I mean, SERIOUSLY??? Could this little Curvy Keepsake box be ANY cuter as anything else but a WATERMELON???? I think NOT!!! And a huge shout out and "thank you" to Lydia Fiedler for her brilliant idea!! Put some watermelon-flavored Jolly Ranchers inside!


Stamps:  NONE
Paper: Pink Passion (retired), Gumball Green (retired), Basic Black
Ink:  NONE
Accessories:  Curvy Keepsakes Thinlits Die

ONE more ... I used the little "Mini Treat Bag Framelit" to make this one. And for those of you who have been hanging out with Stampin' Up for more than a bit might recognize this fun little stampin' wheel ... it's called Nature Hike ... long ago retired but I just couldn't help myself!!! I also used up some of my leftover Baked Brown Sugar cardstock and Epic Day Washi Tape (and who else remembers these cute little clips???). These were SUPER quick and easy ... filled each one with a package of gum.

Stamps:  Nature Hike Jumbo Stampin' Around Wheel (retired)
Paper: Baked Brown Sugar
Ink:  Early Espresso
Accessories:  Mini Treat Bag Framelit, Small Clothespin, Epic Day Washi Tape (retired), Square Clip

I seriously need a NAP!!! Convention this week was an absolute BLAST!!! Here's a photo of the Monday Montage girls that we had someone take for us ... I wish we ALL could have been together, but at least SIX of us had a chance to visit!! Aren't we CUTE??? Left to right - Cathy Casey, Dara Gloden, Bree Renwick, ME, Amy O'Neill, Dani Dzama (I owe ALL of these girls a swap card!!).

Click "Back" for Melissa Stout and "Next" for Amy O'Neill ... brilliance ALWAYS!

 photo blogsignature_zps8e79d50b.png

Sunday, November 23, 2014

Monday Montage #33

What a GREAT way to start off our Thanksgiving week ... by sharing some creativity with the Monday Montage girls!! And while I am at it ... I am SO VERY GRATEFUL to be part of this group of amazingly-talented women. But more importantly, they are all kind, smart, funny and just lovely from the inside out. Blessed to have them in my life!!


Today I am sharing what I call a little "gratitude" tin. I made these with "my girls" (the youth group from church). What you CAN'T see is a bunch of ovals I punched out of just plain ol' printer paper (they are on the inside ... and NO I did NOT punch over 300 for every girl ... I did about 40 or so). The idea is to write down little things that you are grateful for ... or events that took place that make you happy ... on each of the ovals and place them back into the tin as the year goes by. (I just assumed that the girls would use up all the pieces I gave them and figure out something ELSE to write on as the year progresses.) At the end of the year (around next Thanksgiving), they can pull out all the little slips and read about how AMAZING their lives are. I also encouraged them to date each little slip of paper. They could write things as simple as "I love popcorn!" or "Went to the park with my family!" ... anything that made their day happy.

Stamps: Truly Grateful
Paper:  Cajun Craze, Hello Honey, Blackberry Bliss, Very Vanilla, Color Me Autumn DSP
Ink:   Baked Brown Sugar
Accessories: Bitty Banners Framelits, Circle Framelits, Autumn Accents Bigz Die, Baked Brown Sugar Ruffled Ribbon (retired), Autumn Wooden Elements, Linen Thread, Decorative Dots Textured Impressions Embossing Folder, Tea Tin


Here are all of the girls' tins lined up all pretty and fancy ...


We had a GREAT time together decorating our little tins ... these girls but a smile on my face and love in my heart. More blessing for which I am truly grateful ...


Click "Back" to see Melissa Stout's fantastic creation, and/or the "Next" button to see something else to be grateful for from Amy O'Neill!

 photo blogsignature_zps8e79d50b.png