Thursday, May 29, 2008

Long Rectangle Nesties

I love, love, love these long, rectangle Nestabilities!!

I actually have done a three-for-one challenge on this baby. First, I did SC178 - I love this sketch and got to use my long rectangle Nestabilities (hooray!). Also, WT168 - to use some sort of packing/mailing/travel something-or-other . . . in this case I used the "glitter window" technique. Third, I have now completed card #40 in my own personal "Follow the Butterflies" challenge. See the link on the sidebar to the right for more details on that.

If you've never done a glitter window, they really are pretty fun. Just place a piece of packing tape, sticky side up, behind whatever you are going to use as a "frame" for your image (in this case, the square Nestabilities). Then, just sprinkle with some glitter. Voila! Super cool . . .

AND before I forget . . . Menda commented on my last card (the one with the Monarch Butterfly) and asked where I got the diecut. It is made by Quickutz and I got it from http://www.cutathome.com. Here is a direct link to the die itself:

Quickutz Monarch Butterfly

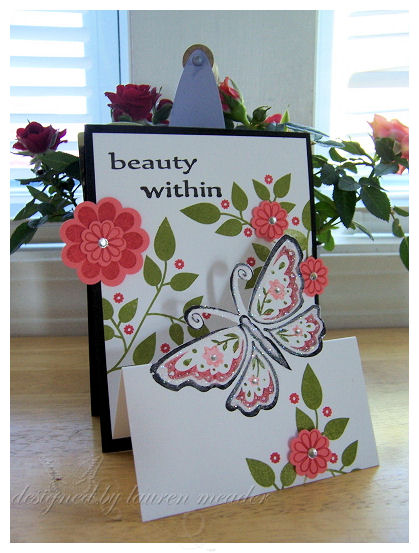
Stamps: Pretty Petals, Amazing to Zany, Designer Butterflies by Hero Arts
Paper: Real Red, Pumpkin Pie, Garden Green, Shimmery White
Ink: Markers - Real Red, Pumpkin Pie, Garden Green, Summer Sun; Inkpad - Basic Black
Accessories: Long Rectangle Scallop Nestabilities, Large Square Nestabilities - Classic and Scallop, packing tape, Dazzling Diamond glitter, May Arts white organza polka dot ribbon, Cuttlebug Swiss Dots ef, dimensionals

Tuesday, May 27, 2008

Believe It or Not . . .

. . . I'm still here!! I swear if I NEVER do another nasty typing project for someone it'll be too soon!! I am about 3/4 of the way through with this nasty thing (have I already used that word??)!! I can't WAIT to be through.

In keeping up on my "Follow the Butterflies" challenge, I made this card for Devan a couple of days ago (see the link on the sidebar for more details, or just watch the slideshow!).

And this really pretty butterfly diecut from Quickcutz . . . once I saw it I knew I HAD to have it. I used a brayer and some Pumpkin Pie ink on some vellum to create the wings. The black "veins" were punched from some old black diamond dust paper I had. I think this is such a cool butterfly!! It just says "WOW" to me! LOVE it!! (And isn't it cool that I can use Quickutz dies in my Spellbinders Wizard??? That baby is just so versatile!!) I just hope Devan appreciates all this girly-girl cards I keep sending him!! What can I say?? Butterflies are girly!!

I also got the layout from last week's sketch challenge on SCS - SC177. I like it a lot and may have to use it again!

I hope to be through this nasty (there's that word again!) typing project in the next couple of days. Then, I need to do my monthly projects for Spellbinders (which I am kind of excited for since I actually have some fun ideas swimming around in my head). I know I have to do at least one butterfly card this week, so I hope to be back in the next day or two!

Hugs to y'all for a happy day!

Stamps: So Swirly jumbo wheel, So Many Sayings
Paper: Basic Black, Barely Banana, Pumpkin Pie, Certainly Celery, Black Diamond Dust, Vellum
Ink: Basic Black, Certainly Celery, Wild Wasabi, Pretty in Pink, Regal Rose, So Saffron
Accessories: Quickutz Monarch Butterfly Die, Distressed Stripes Cuttlebug ef, Black/white polka dot Organza ribbon by May Arts, Family Treasures Daisy punch, 1/4" circle punch, rhinestone jewel sticker by Doodlebug, crop-a-dile, brayer, dimensional

Monday, May 19, 2008

Smile!

This was for last Friday's challenge - LSC168 - to use an alphabet set of stamps to create the focal point (the last card I posted on here also did this, but I didn't know it was a challenge when I did it!)!

I LOVE this set by Papertrey . . . the flowers are so fun and bold and cheerful! I used my large scallop and classic oval Nestablities to create the "window" on the front of my card. No matter how many times I pull my Nesties out, I always love the versatility and the look you can achieve using them! They really ARE cool! (This card was another one that was inspired by the card of Lauren's that I linked in my last post . . . I loved the color combo/stamp set she used, so I used them as a "launchpad" for this card!)

I have a TON of things to be working on during the next week, and unfortunately none of them require me to use stamps (it is the end of the school year, and once again, I find myself more involved that I should really be in more things that I ever intended!)!

I may be a bit sporadic for the next week or so, but promise to pop in occasionally with SOMETHING to share!

Have a great week! :)

Stamps: Jumbo Outline Alphabet, Beautiful Blooms (Papertrey)
Paper: Shimmery White, Cameo Coral
Ink: Old Olive, Cameo Coral, Ruby Red, Barely Banana So Saffron, Black Craft
Accessories: Nestabilities Large Classic and Scallop Oval, Cuttlebug flower diecut, 3/4" circle punch, Stickles, Rustic Retreat olive single-stitched ribbon

Saturday, May 17, 2008

Happy Birthday, Dad . . .

It was my dad's birthday last Tuesday. I tried and tried calling him all day at work . . . no luck. I called him after work. Mom said he wasn't there and to call back in a little while. I FINALLY got a hold of him at around 9:30 at night! I was afraid I was going to miss him altogether on his birthday. Glad I finally connected. We then made plans to go out to lunch on Thursday.

I got up bright and early on Thursday and made him this birthday card (which also went along with SCS WT166 - to use "inchies" (stamps with images that will fit in a 1" square). As it turned out, it ALSO fit perfectly with yesterday's challenge - LSC168 - which was to use alphabet stamps as your focal point. So this card ended up being a two-fer without me even trying. Cool!!

I cut my cardstock at the regular dimensions - 4.25" x 5.5" - but I folded it a little differently. It is folded at 2 1/8" and 6 3/8" along the 8 1/2" inch side (that would 2 1/8" down from the top edge and 2 1/8" up from the bottom edge).

Stamps: It's a Celebration (Papertrey), Collage Alphabet
Paper: Chocolate Chip, Wild Wasabi, Brocade Blue, Night of Navy, Whisper White
Ink: Chocolate Chip, Wild Wasabi, Brocade Blue, Night of Navy, So Saffron
Accessories: 1 1/4" and 1 3/8" square punches, 1 1/4" and 1 3/8" circle punches, Wild Wasabi double stitched ribbon, Cuttlebug Swiss Dots embossing folder, dimensional

Friday, May 16, 2008

Caught Another Butterfly!

I'm trying to "catch up" for all of the days that passed over the last two weeks where I DIDN'T post a card. Here is card #38 in my "Follow the Butterflies" challenge (see the sidebar for a link to more info, or the slideshow of butterfly cards already done!)

I saw the GREATEST card on Lauren Meader's blog last week . . . so I decided to do my own take on it. I should just leave this one to her, as hers totally rocked the SOCKS off of mine!! I did this for CC166, again trying to step out of my "color box" . . . not sure I love the results, but I DO love Lauren's idea, and plan to try it again soon when I can spend more time making it fabulous! Here is a link to her card:

Lauren's Card

You can see from her photo how the card is folded up from the bottom, and then the butterfly is cut (using an Xacto or craft blade) just around the top edge to make it look almost 3-dimensional.

I also pulled out my reinkers and blender pens to make this work with TLC168 - watercoloring AND heat embossing.

Stamps: Garden Silhouettes, Butterflies (Stampendous), In the Stars (sentimet)
Paper: Ruby Red, Shimmery White, Soft Sky
Ink: Basic Black craft and classic, Ruby Red, Pumpkin Pie, Soft Sky
Accessories: Rustic Retreat ribbon, iridescent ice embossing powder, notched corner punch, glue dots, exacto razor

Thursday, May 15, 2008

Inspiration??

I love doing the daily challenges on SCS (although I do NOT always do them daily . . . in fact I am lucky to average one or two a week). One that I haven't ever done is the inspiration challenge that they post on Saturdays. I guess it is because I am usually doing the Saturday-run-around-mom thing. For some reason, I was putzing around on the computer last Saturday and came across the inspiration challenge. I thought it looked kind of fun, so I took a stab at it.

This is what I came up with. I think this card is kinda weird. I knew I wanted to do a pieced square background, but I didn't want to risk messing it up, so I didn't use my square punch (I know that sounds like it would be easier, but if you misalign the punch just a little bit, the whole thing goes whack!). So, I just ended up cutting them out myself, which, as you can see, made for a very crooked bunch of squares.

The butterfly, on the other hand, brings my total of butterfly cards up to 37 (see the sidebar for more details and a slideshow!). I made him using my large and small oval punches from Stampin' Up. Not sure if I have ever seen that somewhere or if it just came to me in a vision (I am NOT prone to visions, so I must've seen to somewhere at some point and just filed it in the useful information file in the back of my head). If this was your idea and YOU invented, I am sorry for not giving credit where credit is due!!

Here is a link to IC127, so you can see the suncatcher that inspired this goofy card:

SCS IC127 - Suncatchers

Still not sure I totally love this card, but I think the idea for it is okay . . . I may "redo" this and case myself at some point to see if I can come up with one I like better!!

Keep smilin'!

Stamps: Serene Sunflower, Sprinkles, So Many Sayings
Paper: Certainly Celery, Whisper White, Basic Black, Regal Rose
Ink: Basic Black, Certainly Celery, Wild Wasabi, Pretty in Pink, Regal Rose, So Saffron
Accessories: Three for You flower punch, large and small oval punches, black rhinestone sticker by Doodlebug, black gingham ribbon, pop-up glue dots

Wednesday, May 14, 2008

Promises, Promises . . .

I have been TRYING to get this post put together for DAYS! Every time I have a few minutes to get to it, there is NO ONE around to help me by taking some pictures . . . so that is why this has taken so long! It seems that life gets REALLY busy at the end of the school year.

So . . . AS PROMISED . . . here is the tutorial doing "reverse stenciling" with a Spellbinders die . . . (and I also PROMISE, that you are going to love this technique!)!!

STEP ONE: Ink up your die. I have found that small ink pads work the best, as they are the easiest to manipulate. For example, a Stampin' Up "spot" pad, or a Color Box "cat eye" shaped chalk ink pad work really great. In any case, you will need a slow-drying ink (SU craft ink and chalk inks work splendidly!). You can see that after giving you all this great advice, I used a regular-sized ink pad . . . mostly because it was the only one I had in the color I wanted to use!! (In this case, SU Chocolate Chip craft ink!)

Here is a picture of what the die looks like after it has been all "inked up" . . . make sure that the ink makes it into all the "nooks and crannies" on the die. (And YES, I AM holding this poor die upside-down! I didn't realize that I was doing that until I had finished going through the whole process, and my photographer had already left for school!!! What's a girl to do?? I just ran with the photos I had!)

STEP TWO: Once the die has been properly inked, run it through your die cut machine to cut; switch the "sandwich" and run it through again to emboss it. (Yeah, yeah, yeah . . . the poor wheelbarrow is STILL upside-down . . . directionally-challenged, I guess!) As you can see from my inky fingers, it does kinda get all over ya, but luckily it cleans easily. I have also noticed that I wish I had lovely, long fingers with beautifully-manicured fingernails . . . sigh . . . guess ya can't have EVERYTHING!!

That's pretty much it. So you can see, there is hardly anything to it, yet the results are AWESOME. (Did ya notice that I finally got the little wheelbarrow right side up?? Hooray for me!!)

I have included this extra picture to show you what the die looks like, cut and embossed, without and WITH the ink. The details just POP right off of it. This technique is worthy the sticky, inky fingers. It's one of my new favorite things!

Thursday, May 8, 2008

Ink, but No Stamps!!

Have you ever had one of THOSE weeks??? I have been having one this week, and have not had ANY time to "play" with my stamps (and they are getting lonely)!! I decided to post this little card I made for Spellbinders last month. Isn't it just the springiest???

One of the girls on our design team (that would be Michelle Klomp . . . hey, girl!!), figured out a fun little technique that NONE of us had ever tried, and I used it on this card. Before running the diecut sandwich (white embossing plate, white spacer plate, die - face up, cardstock, white embossing plate) through the Wizard, she inked up the die. You then run the sandwich through again, this time with the "embossing recipe" without removing the die. What??? The stack would then be white embossing plate, die, cardstock, tan embossing mat, white embossing plate. Basically, I used SU craft spots and "sponged" up the cutting side of the die (the one with the raised edge). You really only need to make sure the ink covers the area INSIDE the raised edges. Then, when you run the whole sandwich through, the ink transfers to the cardstock in the "positive" spaces. It totally adds a WHOLE new dimension and makes these Spellbinder dies just "POP" right off the page! I did it on the wheelbarrow with Chocolate Chip craft ink, and again on the flowers, using various colors. I LOVE the effect!! I will be doing a tutorial with photos in the next day or so (life has been really nutso this week . . . . loooonnnnggg story!). If you are anything like me, photos are a MUST (I'm totally a visual learner!!).

The card is a 4 1/4" x 11" piece of cardstock, scored at 4 1/4" and 8 1/2". I used the outside edge of CM circle cutter to trace the "flap" edge to give it a more rounded look. I also used a Fiskars texture plate to emboss the cardstock on the front of the card.

I really hope I get a chance to stamp today, but it may not be until tomorrow, as I have a very full schedule!! I HATE weeks like this!!

Stay tuned for step-by-step photos!!

Cardstock: ColorMates by WorldWin - Lt. Chocolate Malt, Lt. Pretty Pink, Dark Pretty Pink, Deep Pretty Pink, Lt. Sunshine Yellow
Accessories: Glue Dots, Creative Impressions Flowers Clip and Sparkly, Brad, Paper Glide by Inspired Crafts, American Crafts Butterfly Ribbon, Fiskars "Whimsy" texture plate, paper piercing tool, Circle Cutter by Creative Memories
Spellbinders: Wizard, Flower Creations Die (S4 072) and Wheelbarrow Die (S3 136)