Showing posts with label Christmas. Show all posts

Monday, January 6, 2025

Monday Montage - Christmas Card 2024


Do ya remember that time I was soooo late getting my Christmas cards (December 23!) that I didn’t post them until the new year??? You DON’T??? See the last few years … because I keep doing that!

This week’s Monday Montage is full of so many wonderful creations.

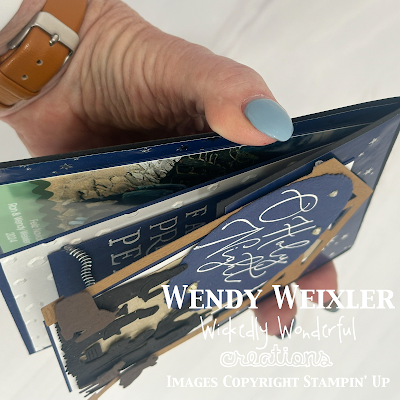
I used a retired set from last year … Night Divine. There were stamps and dies and I used them up, baby!


This multi-layered flip card is a template I have used several times this year. I love it!

I did cheat with the “DSP”. It actually isn’t Stampin’ Up paper AT ALL! I knew I was going to be making 100 of these (yes, yes … I am crazy!)! It is actually a roll of wrapping paper. Saved me a TON of time on stamping and embossing. Because, to be honest, this took a ton of time even withOUT doing that!

BASE:
- Basic Black: 4 1/4" x 11", score at 5 1/2"
- Cut off 2 3/4" on one end for TOP
- Designer Series Paper (top): 2 1/2" x 4 1/8”
- Designer Series Paper (inside): 4” x 5 1/4"

TOP:
- Crumb Cake: 2 3/4" x 4 1/4"
- Basic White: 2 5/8” x 4 1/8”
- Designer Series Paper: 2 1/2" x 4”
INSIDE CARD:
- Night of Navy: 3 1/4" x 10”, score at 5”
- Basic White 3 1/8” x 4 7/8”
- Night of Navy: 2 3/4” x 4 3/4”

Stamps: Night Divine (retired)
Paper:  Basic White, Basic Black, Night of Navy, Early Espresso, Pecan Pie
Ink: Basic White Craft
Accessories: Night Divine Dies (retired), Deckled Circle Dies, Sequin Embossing Folder (retired), Splatter Embossing Folder (retired), Silver Sequin Trim (retired), Basic Rhinestones


This is a photo my hubby and I had taken at the top of Machu Picchu last January. It was as magical as it looks … I honestly cried! What a wonderful bucket list item!! We talk about it all the time!


Here’s a pic so you can so all the lovely layers. Not sorry I attempted such a crazy creation … the feedback I’ve been getting from friends and family has really warmed my heart!

Our Monday Montage Hop has gone exclusively to Instagram! You can check it out by finding me @tinkermom85. From there you will be able to find all of my Monday Montage Friends, too!

Monday, December 30, 2024

Stampin’ Fancy Friday - Pretty in Plaid


Just a LITTLE bit more Christmas before the year officially comes to a close!

How many different die sets can one use on one creation??? At least FIVE, right??? Sometimes, if less is less then more is MORE!! I kind of went out of control with this one … I started with the “Pretty in Plaid” theme placed for the Stampin’ Fancy Friday team this month and kept going from there!!
I started with some pretty plaid DSP - courtesy of Reindeer Days! The layers were cut using Perennial Postage Dies. I splattered the Basic White layers (except for the card base) using my Real Red and Granny Apple Green Stampin’ Blends and embossed each of these layers using the Perfect Plaid 3D Embossing Folder.

The wreath was cut using a die from Encircled in Nature. The green medallion in the center comes from Spotlight on Nature.

Last, but not least, I used the Mini Alphabet Dies to cut the word “Joy”, also from the Reindeer Days DSP.

I topped it all off with a few Real Red & White Adhesive-Backed Peppermints and some White Baker’s Twine. It looks like a lot, but it came together quite quickly!

Stamps: NONE
Paper: Basic White, Garden Green, Reindeer Days DSP
Ink: Stampin’ Blends - Real Red, Granny Apple Green
Accessories: Perennial Postage Dies, Encircled in Nature Dies, Spotlight on Nature Dies, Mini Alphabet Dies, Perfect Plaid 3D Embossing Folder, Real Red & White Adhesive-Backed Peppermints, White Baker’s Twine

Check out all the fun things created by the Stampin' Fancy Friday Team on Instagram at https://www.instagram.com/stampinfancyfriday/!!

photo blogsignature2018_zpsxetiovv3.png


Friday, November 22, 2024

TGIF Challenge #500! - Let’s Tear It Up!


HOLY 500, BATMAN!!! Today is officially the 500th TGIF Challenge Hop! Can you believe that??? I can’t begin to express how grateful I am to be part of this group of creative, kind and amazing crafters!

This week we are going with a technique challenge … one that has made the rounds (it was all the rage over 20 years ago when I started this crazy papercrafting journey and is making a comeback now … not that it ever totally went away!)!!


The only thing I actually stamped on this card is the sentiment, which is from “One of a Kind”. The rest is all DSP, paper tearing, ink flicking and die cutting!

I used a combo of Basic White with DSP from Country Woods AND Reindeer Days to create the torn layers. I always love it when shapes on the DSP can easily be cut with dies that accompany the suite/bundle. Isn’t the little reindeer adorable??


I created the “medallion” using a die from Reindeer days that I cut out a second time with a die from Spotlight On Nature. 

I added a little more texture by flicking some ink using a Poppy Parade Stampin’ Blend. And the little adhesive-backed peppermints just make my heart happy!


Stamps: One of a Kind
Paper: Basic White, Country Woods 12x12 DSP, Reindeer Days 12x12 DSP
Ink: Real Red; Poppy Parade Stampin’ Blend
Accessories: Reindeer Days Dies, Spotlight On Nature Dies, So Swirly Embossing Folder, Peppermint Adhesive-Backed Dots, Crumb Cake Baker’s Twine

We’d love to have you play along … and look forward to the next 500 challenges!! You can check us out our blog HERE and Instagram … lots of great inspiration from the rest of the TGIF Crew!

Sunday, January 7, 2024

Monday Montage #252


My New Year's Resolution for 2024 is to have all of my Christmas cards to be completely DONE by November! This was also my resolution last year ... I even started them in April ... then my son got engaged and we went into FULL wedding overdrive! Then there was my knee fiasco ... and I ended  up in crazy Christmas card making overdrive!!! Now that they are complete and mailed (and received) by everyone, I am happy to be able to share them for this Monday Montage! Fair warning ... most of what I used to make it was NOT Stampin' Up (what my friend, Jan Tinklenberg, always called "Rubbadultery"!)!! The cardstock is ALL Stampin' Up, though!


How adorable is this little gnome girl drinking a cup of hot chocolate?? I made her using some dies from Jaded Blossom. I cut the card bases (White, Cajun Craze, and some DSP from Echo Park (Gnome for Christmas Woodgrain Snowflakes). The aspen trees I cut with my Cricut. I didn't even actually stamp the sentiment, either ... I used the draw then cut feature on my Cricut to do those, and they went SUPER quick and easy!!


With this close up you can see all of the cute stitching around the edges of the Jaded Blossom Gnome Dies (the whipped cream on the hot chocolate just KILLS me!!)!


Stamps: None
Paper: Whisper White, Cajun Craze, Cherry Cobbler, Petal Pink, Early Espresso, Echo Park Gnome for Christmas Woodgrain Snowflakes
Ink: None
Accessories: 
Digital Insert created with Project Life and Rhonna Designs Digital Scrapbooking


Here's a blog roll just in case you get "stuck" trying to hop around ...


Click "Next" to see Bree Renwick ... she made the most ADORABLE card that would be perfect for the "Dad" in your life!


photo blogsignature2018_zpsxetiovv3.png


Sunday, December 17, 2023

Monday Montage #251


The age-old question ... one week prior to Christmas ... is, "Are you ready?" The answer for me would be a RESOUNDING NO!! As I have been busiedly been working on THIS year's Christmas cards I was realizing that I had never posted LAST year's Christmas card! So, for this week's Monday Montage I present to you The Weixler Family 2022 Christmas Card! (Better late than never, right???)


This little baby has a TON of separate pieces on it!! I used the Trees for Sale Stamp Set in conjunction with the matching Tree Lot Dies. Boy was this FUN ... for maybe the first 50 or so times! It took a LOT of time (which I enjoyed since I was in my dining room right next to our newly-installed gas log fireplace insert!!). I stamped off the trees in the background in two different colors (Evening Evergreen and Soft Succulent). I tend to looooove making Christmas cards that are truly a labor of that love! 
This is the digital layout I did for the inside with cute pix of my family. Seeing as we live in different states, I was grateful to get everyone in the family in  the card! Yay! Success!

Stamps: Trees for Sale
Paper: Whisper White, Soft Succulent, Evening Evergreen, Crumb Cake, Cherry Cobbler, Real Red, Daffodil Delight, Silver Foil, Smoky Slate
Ink: Black Memento, Soft Succulent, Evening Evergreen, Smoky Slate, Daffodil Delight, Soft Suede; Stampin' Blends - Daffodil Delight, Real Red, Garden Green, Highland Heather
Accessories: Tree Lot Dies, Wink of Stella
Digital Insert created with My Memories Suite.

Here's a blog roll just in case you get "stuck" trying to hop around ...


Click "Next" to see Bree Renwick... and "Back" to see Emily Kimmey ... so happy they were able to play along this week!


photo blogsignature2018_zpsxetiovv3.png


Sunday, December 3, 2023

Monday Montage #250


Welcome to this week's Monday Montage Blog Hop! Believe it or not, this was the absolute FIRST Christmas card I have made at ALL this year! What is even up with that??? The last few months have been such a blur ... I finally cleared off my crafting table and got some order replaced in my craft room, so that most definitely helped!!


I had more fun than I care to admit paper piecing the poinsettias from the Rustic Crate Stamp set. I stamped the main floral image on each of the colors of cardstock I used ... Shaded Spruce, Real Red, Cherry Cobbler and Daffodil Delight. I find fussy cutting very relaxing and kind of therapeutic. I accented the leaves and petals with a little bit of white gel pen and some Wink of Stella (which, sadly, doesn't always photograph well). 


I added a little panel behind the crate using the Countryside Corner Dies and the Merry Melody Embossing Folder (sponged with a little bit of Pecan Pie ink). I wanted to add a little bit of "Christmas Caroling" to this card and I love how it turned out!

Stamps: Rustic Crate
Paper: Whisper White, Crumb Cake, Real Red, Cherry Cobbler, Early Espresso, Daffodil Delight, Shaded Spruce, Glorious Gingham DSP, Three Color Glimmer Specialty Paper, All About Autumn DSP, Gold Foil DSP
Ink: Black Memento, Pecan Pie, Early Espresso
Accessories: Rustic Crate Dies, Countryside Corners Dies, Music Melody Embossing Folder, Pecan Pie 1/2" Bordered Ribbon, Adhesive-Backed Speckled Dots, Wink of Stella, Stapler, White Gel Pen

Here's a blog roll just in case you get "stuck" trying to hop around ...


Click "Next" to see Bree Renwick... and "Back" to see Emily Kimmey ... love the inspiration I get from everyone on this team with every hop!


photo blogsignature2018_zpsxetiovv3.png


Sunday, December 18, 2022

Monday Montage #227


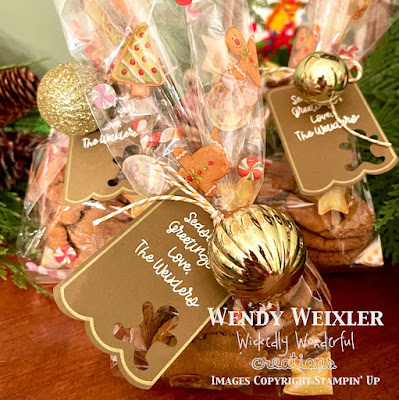
Still in "Deck the Halls" mode over at my house! To be honest, I've been working on my Christmas cards for weeks ... but I AM approaching the finish line!! YAY!! And over the weekend we had "Keebler Elf Sunday" at our house.  The kids come over and we make cookies for our friends and neighbors ... about 1,000 of them, to be more accurate! They are then bagged and tagged and made ready for delivery! It's a busy process, but we have it down to a science and get it done in a few hours. We love this family tradition, during which we also watch "Jingle All the Way" ... the best worst Christmas movie of all time!


I used my Cricut to make these fun little tags too label all the bagged cookies. Aren't they cute??? I got a new Bosch mixer for myself as an early Christmas present (my old Kitchenaid bit the dust a couple of weeks ago after more than 20 years of faithful service!) and it was HEAVEN to use!! These cookies are honestly the tastiest, softest and most delectable little cookies EVER! You will LOVE them!

Stamps: NONE
Paper: Soft Suede
Ink: Sakura White Gelly Roll, Gold Metallic Cricut Marker
Accessories: Bakers Twine, Small Gold Ornaments


Lucky Pennies

2 1/4 C. all-purpose flour
2 t. baking soda
1 t. ground cinnamon
1 t. ground ginger
1/4 t. ground nutmeg
1/4 t. ground cloves
1/4 t. salt
3/4 C. (1½ sticks unsalted butter, softened)
1 C. firmly packed brown sugar
1/4 C. molasses
1 large egg
granulated sugar (for coating cookies)

In a large mixing bowl, stir together the flour, baking soda, cinnamon, ginger, nutmeg, cloves and salt. In a separate large bowl, use a wooden spoon to cream the butter and brown sugar until smooth. Stir in the molasses and egg and mix until well blended. Gradually stir in the flour mixture until combined. Cover the dough and refrigerate it for at least 1 to 2 hours or until firm enough to roll into balls.

Heat the oven to 375 degrees. Use a spoon to scoop the dough out of the bowl, then roll it with your fingertips into balls that are about one-inch in diameter (I think we actually go up to 1.5" diameter). Roll the balls in a shallow bowl of granulated sugar. Place the balls on an ungreased baking sheet, leaving 2 inches between the cookies. Bake for 6 to 9 minutes or until the cookies are crinkled and set.

Cool the cookies on the baking sheets for about 5 minutes. Using a metal spatula, transfer them to a wire rack to cool completely. Repeat until all the dough is used. The cookies can be stored in an airtight container in the freezer for up to 1 month and at room temperature for up to 1 week.

Special note: This is a recipe that does NOT double/triple very well. If you want to make LOTS of them, you should make a separate batch of dough each time.

Here's a blog roll just in case you get "stuck" trying to hop around ...


Just a few more things to pick up and I will be done shopping ... and HOPEFULLY Christmas cards will be in the mail Tuesday (FINALLY!!)! Gettin closer every day!

Click "Next" to see Bree Renwick... and "Back" to see Emily Kimmey - you'll love them!


photo blogsignature2018_zpsxetiovv3.png

MonM

Sunday, December 4, 2022

Monday Montage #226


Trees are up ... lights are on the windows and eaves on the front of the house ... some presents are purchased ... and my Christmas cards have actually been started! Still a very looooong way to go, but I am making a dent!! Took a little time out from all my Christmas projects to make ... what?? A Christmas card!! YAY for Monday Montage!


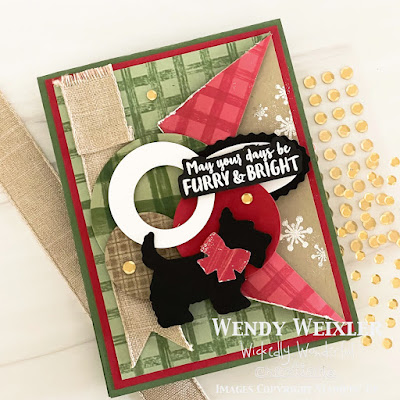
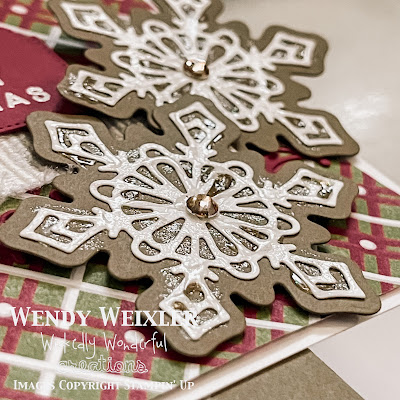
Woof! Woof!! Woof!!! Doggies just make me happy! The sweet little scottie dog in the Christmas Scottie Set is so dang darling!! He also comes with a Scottie-shaped punch! Could NOT get any more cute than that!! Combined with some folded DSP, heat embossed snowflakes, stamped tone-on-tone shpes and a good neutral ribbon and VOILA! A few white-embossed snowflakes and three gold sequins wrap this all together. 


Up close you can see how the stamped Crumb Cake circle of plaid and the little accent sequins all add just the things this card needs!

Stamps: Christmas Scottie
Paper: Real Red, Garden Green, Basic Black, Crumb Cake, Gingham Cottage DSP
Ink: Versamark, Crumb Cake
Accessories: Stylish Shapes Frames, Double Oval Punch, Natural Finish 7/8" Ribbon, Pastel Sequins, White Embossing Powder


Here's a blog roll just in case you get "stuck" trying to hop around ...


Hopefully I will be MUCH more prepared with Christmas gifts/cards the next time I post!

Click "Next" to see Bree Renwick... and "Back" to see Julie Warnick - LOVELY creations!


photo blogsignature2018_zpsxetiovv3.png

MonM

Wednesday, October 19, 2022

Happy Holidays from the Freaks!


I seem to have skipped right past fall and gone to Christmas (as far as card making goes!)!! But the Control Freaks are ramping it up for the holidays already!! If you just came from the super-creative Bree Renwick you would have seen some happily haunting Halloween cards! I LOVE them!! Because I am STILL reorganizing/cleaning my craft space, I decided to use some of the things that were left out from the card I posted last Sunday night ... and they worked GREAT!! 


I have always loved the combination of gold with Very Vanilla ... it is just so elegant!! This card actually came together quite quickly and easily ... I am really loving how the Whimsical Woodland 3D Embossing Folder provides such a great contrast in the background!
It was really hard to capture the gold sentiment ... I used some gold embossing powder over Versamark ... hard to tell, but in person in looks SO shiny and fun!

Stamps: Framed & Festive Stamp Set
Paper: Very Vanilla, Gold Foil
Ink: Versamark
Accessories: Framed Florets Dies, Gold Adhesive-backed Swirls, Gold 1/4" Shimmer Ribbon, Whimsical Woodland 3D Embossing Folder, Trio Corner Punch (retired ... and I forgot!! Sorry ... it's one of my faves!), Gold Embossing Powder

We are installing gas log inserts to the two chimneys in our house. The house is 102 years old, and the chimneys have been CRUMBLING down for years (they ended up being in MUCH worse shape than we had originally thought!). We haven't had a fire in MANY years because Salt Lake City gets the WORST air pollution during the winter (we are kinda shaped like a bowl with mountains surrounding the valley, so all bad air gets trapped in an inversion between storms). I can't WAIT until they are all completed ... TWO working fireplaces!! I LOVE to snuggle and read in front of a lovely fire, and the weather is starting to turn crisp ... something SUPER fun to look forward to!

Next up? Deb Henderson! Can't WAIT to see what she did (I didn't see a preview!)!

<
photo blogsignature2018_zpsxetiovv3.png

Sunday, December 19, 2021

Shine On with the Freaks!


And just like THAT, Christmas is only SIX days away!! I have had hardly ANY time to create lately, and now it seems I am in overdrive trying to do all the Christmas stuff (cards, neighbor gifts/tags, shopping, wrapping, baking, decorating ... the list goes on and on, doesn't it??)! Did ya check out the sparkly Christmas tree made by Bree Renwick? It's so fun ... and I LOVE the color combo! 
I've been wanting to play with the Frosted Gingerbread stamps and Gingerbread dies since the minute I laid eyes on them ... aren't they ADORABLE??!??

With this card I made a z-fold ... which I have not done in FOREVER!! Start with a piece of cardstock that is 8.5" x 5.5".  Use your Simply Scored and score lines at 2 1/8" and 4.25".  You will then be able to fold the base into a "z" so that you can made this fun card!

Stamps: Frosted Gingerbread
Paper: Whisper White, Soft Suede, Real Red, Gingerbread & Peppermint DSP
Ink: Versamark, Real Red
Accessories: Gingerbread Dies, Ornate Frames Dies, Shimmery Crystal Effects, Wink of Stella, Champagne Rhinestone, Whisper White Embossing Powder, White Frayed Ribbon


If you look closely you can seee that I made the icing kinda "sparkly" on this snowflake-shaped Christmas cookies.  I used some Shimmery Crystal Effects ... and THEN when they were dry I brushed them with some Wink of Stella ... I love how shiny AND glittery they turned out!!

To add even a little more "shine" I accented the center of the cookies and the sentiment tag with some Champagne rhinestones.  Also, the soon-to-be-available White Frayed Ribbon has just a little bit of glimmer to it ... ooooooooo! Sooooo pretty!


Here's a little peek at the inside (what you see behind the front panel when you open up the "z").  Something about fun and funky folding just makes me happy!

I'm headed into week #3 of wearing a silicone patch on my surgical incision from my achilles/bone spur surgery ... and it really seems to be working! I am SOOOOO happy! I am actually wearing MATCHING shoes ... with NO backs cut out! I have even started to run again ... it's a CHRISTMAS MIRACLE!!

Next up? Cindy Elam! She has not one, not two but THREE beautiful and shiny creations to be inspired by!

photo blogsignature2018_zpsxetiovv3.png